At IDR Solutions I mainly work on the Development of the JPedal Java PDF Library and PDF to HTML5 Converter. Recently I have also spent a lot of time studying the cloud and thought it might be useful to create some guides on how to use various cloud platforms with the NetBeans IDE.
Last time I wrote about ‘How to set up Amazon Cloud/AWS Elastic Beanstalk on the NetBeans IDE‘, this time I will take you through using Microsoft Azure with the NetBeans IDE. To test our applications locally we are going to use an Apache Tomcat 8 server, which I will take you through how to install if you haven’t got it already. I’ll also give a quick explanation of some common errors that can occur upon installation and how to fix them.
You may have guessed that we use the NetBeans IDE here at IDR Solutions. The Azure cloud at present does not offer any plugins to support direct deployment from NetBeans to this cloud but once you have your Azure account set up correctly, it is quite easy to upload a WAR (Web application ARchive) file. Don’t worry if you don’t know how to create a WAR file, I will explain all of this later on in this tutorial.
What you will need before you start:
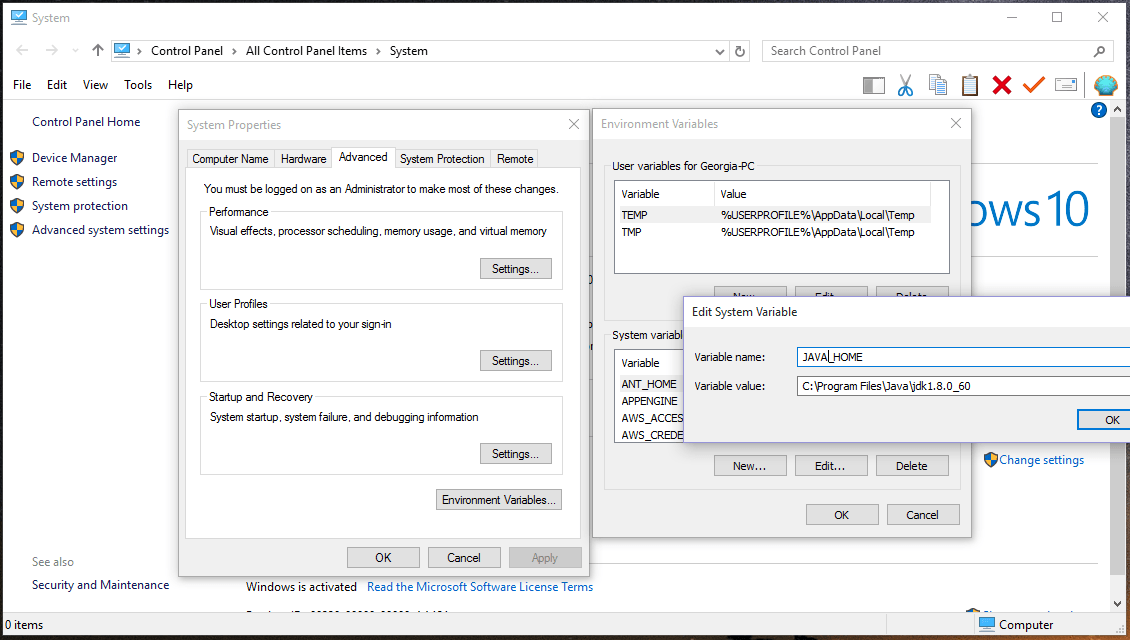
- – Java 8 JDK installed. Make sure you set the SDK as your JAVA_HOME environment variable. On Windows, you can do this by going to our control panel, System and selecting Advanced System Settings. From there select Environmental Variables and click the New button in the System Variable s4ection. Then enter JAVA_HOME for the variable and the path to our Java 8 SDK folder.
1. Sign up for an Azure free trial account
As always the first step is to sign up for a free trial account with your chosen cloud provider. You can do so by visiting their website. The trial is available for 30 days with no option to extend the trial like some other cloud providers offer, on the other hand, though you receive $125 worth of credit to use over all of the cloud services. The AWS trial was quite restricted by the functionality you could access but this trial offers the whole package. After the trial expires you can optionally look into using the pay-as-you-go option if the 30 days weren’t enough for you. They also have a cool Pricing Calculator to help you estimate the pay-as-you-go expenses.
2. Azure Portal
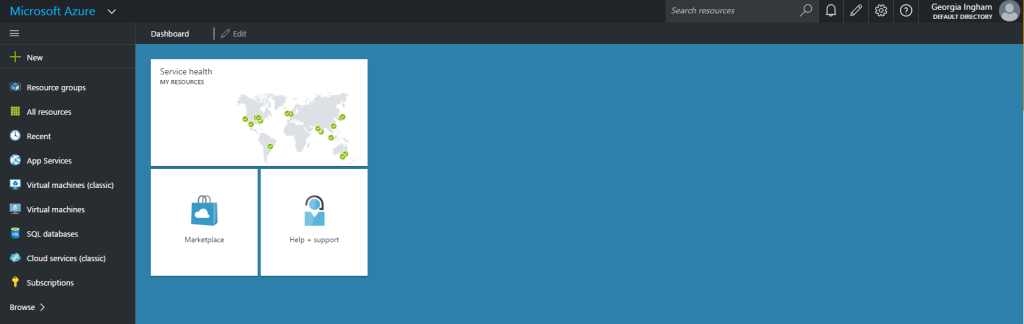
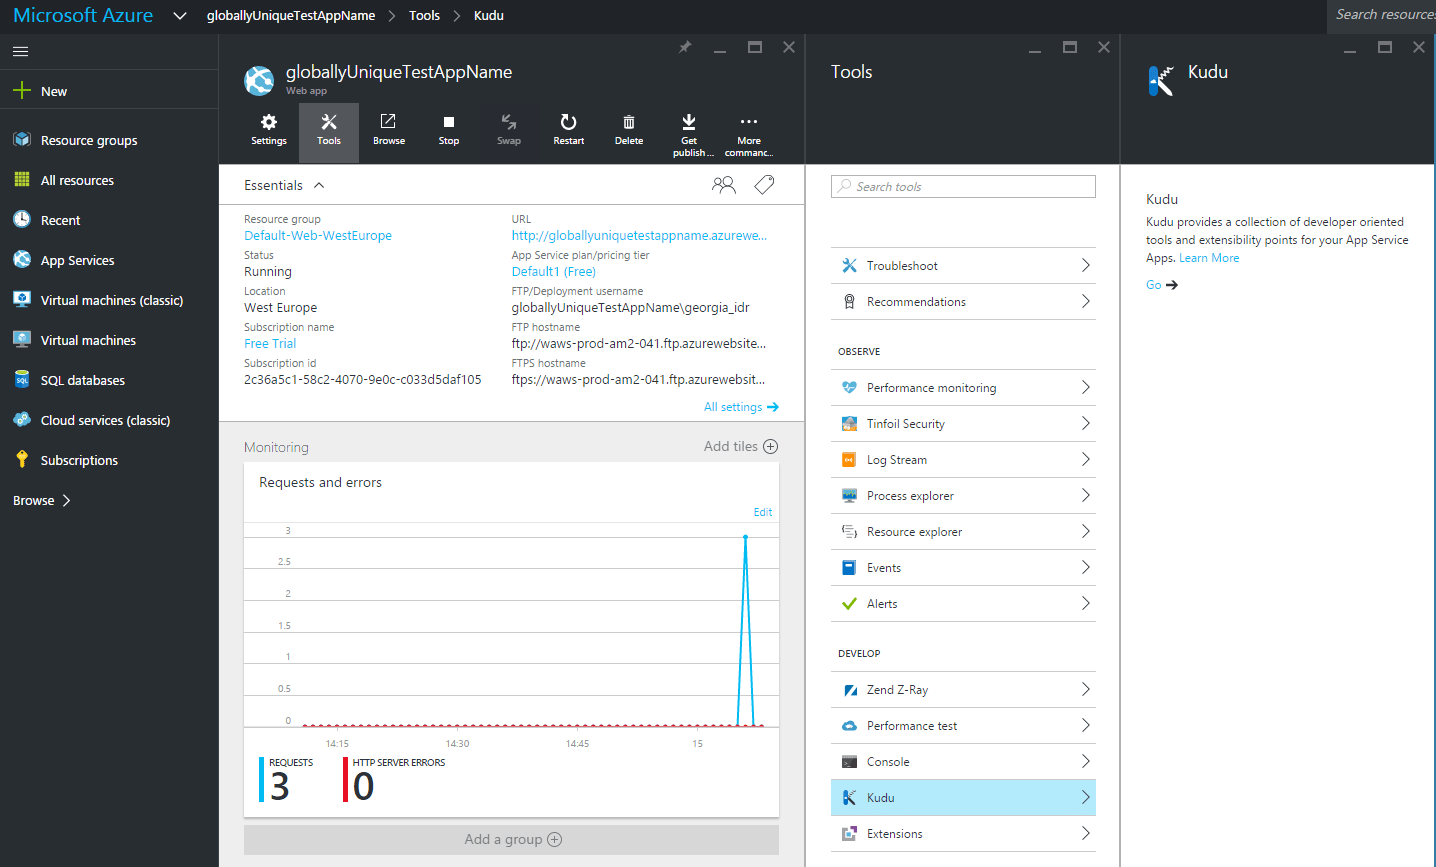
You can access the portal and sign in to the account you created when signing up for the Azure free trial. Below is a picture of the portal. You have the dashboard in the main section which you can pin any frequently used utilities or applications.
3. Create a Tomcat Application
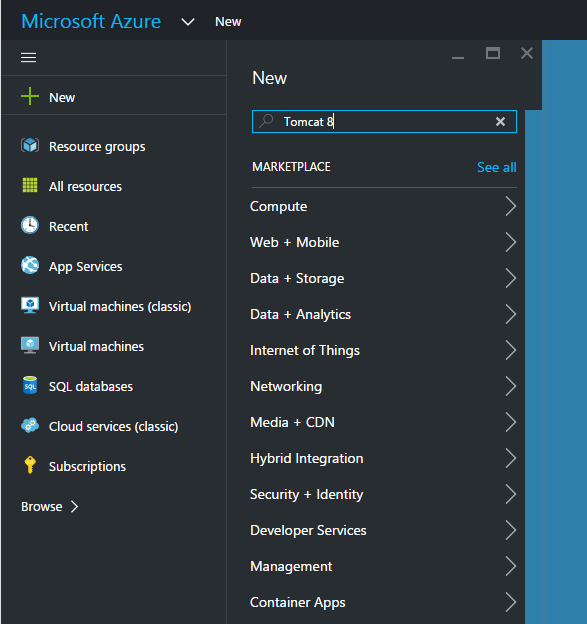
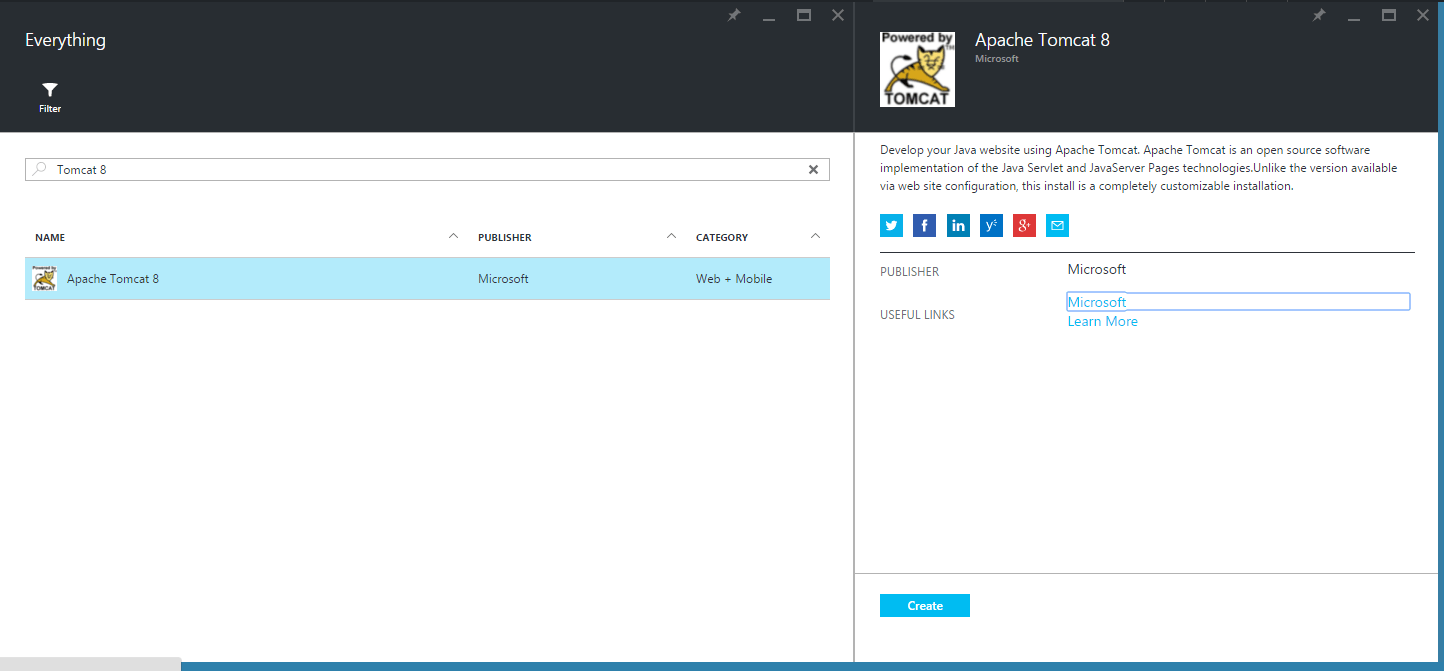
We need to create a Tomcat server on Azure which we will deploy our application. To do this go to New and in the search bar at the top of the new window input Tomcat 8 and hit enter.
Select the Apache Tomcat 8 option, which will open a new window and click Create.
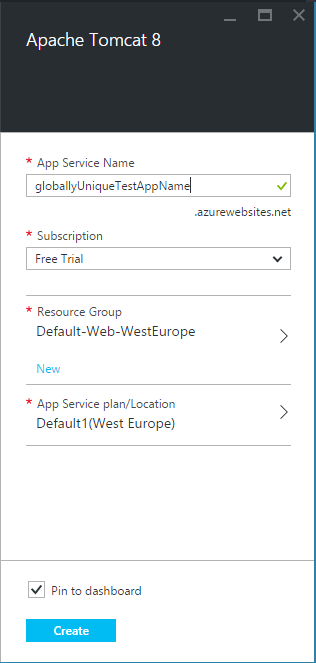
And wow another window opens! You can enter your application’s name here. The name has to be globally unique so you might have to put a slightly odd name in. Once you have done that make sure Pin to the dashboard is ticked and click Create.
Your server will then be started. This could take a couple of minutes so I would suggest a quick cuppa. Once this has completed you will see the server’s controls and settings.
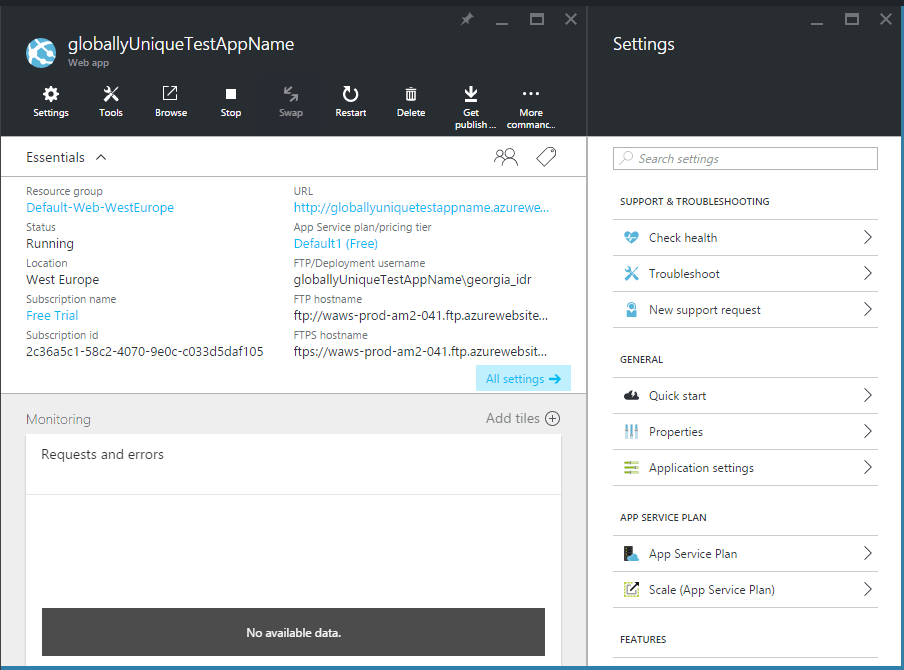
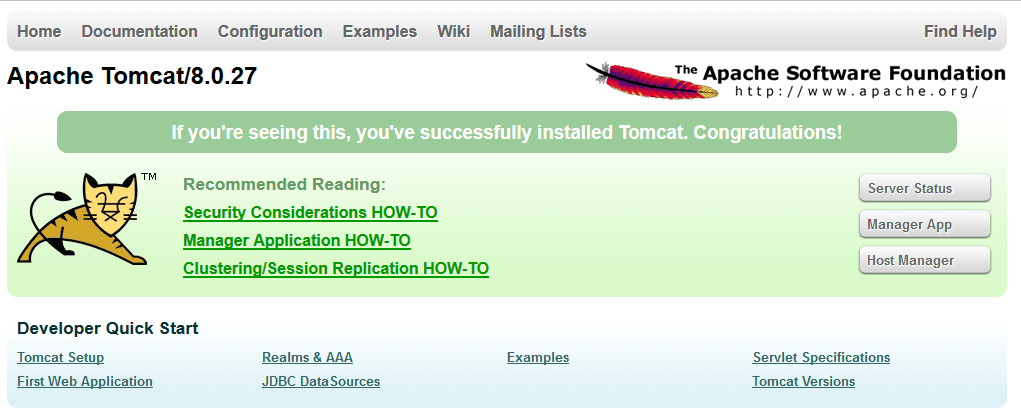
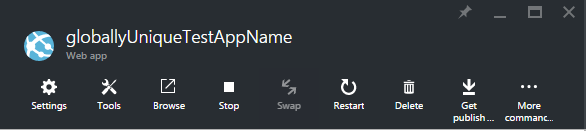
Your server should now be running. You can access it by going to http://yourAppName.azurewebsites.net/ Mine was: http://globallyuniquetestappname.azurewebsites.net/ If your server was created correctly then you will see the Tomcat start page below.
Please note that a running server can eat away at your credit. You can stop your server by hitting the Stop button in the servers top menu bar (see below screenshot).
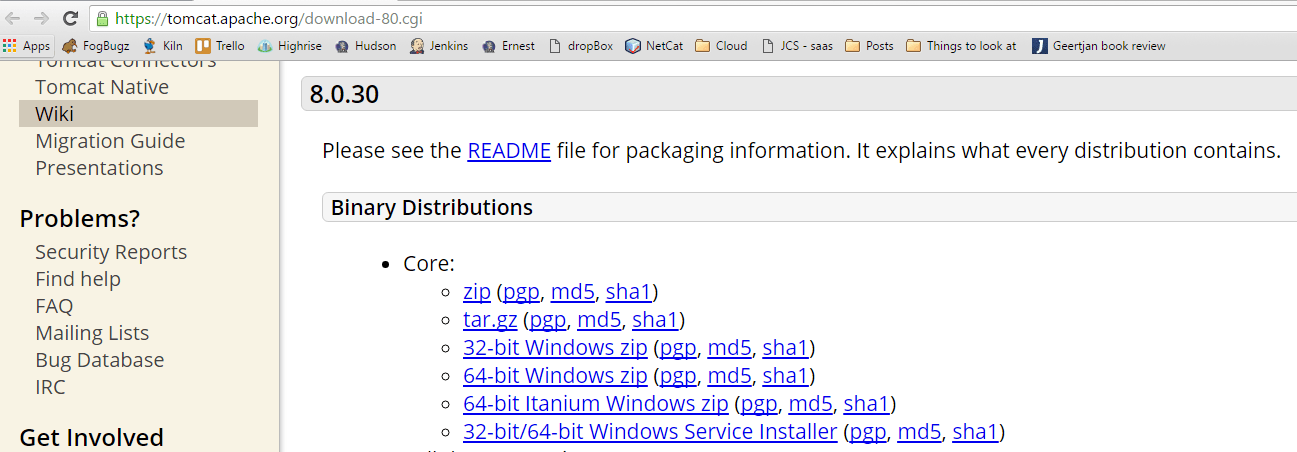
4. Download the Apache Tomcat 8 server
We are going to create a Tomcat server locally to use for testing purposes, so you need to download the relevant binary distribution core zip of Apache Tomcat 8.
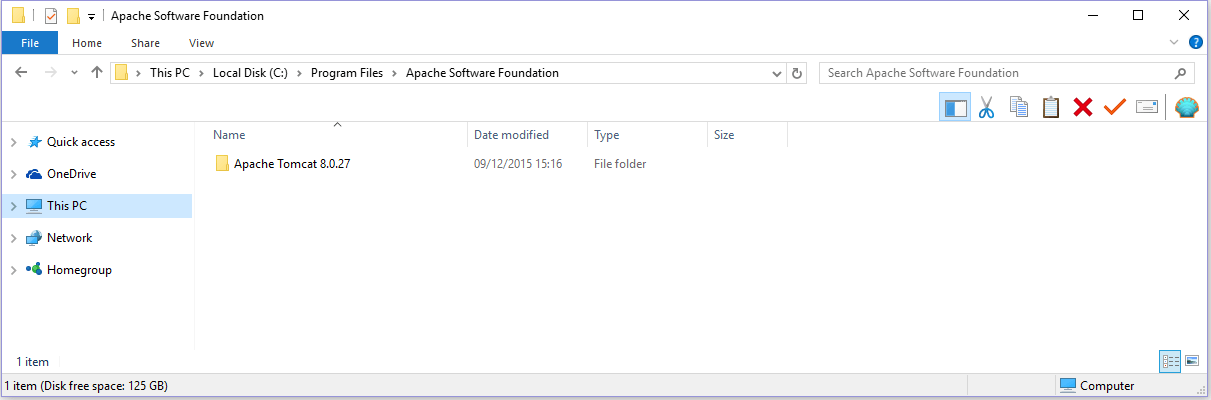
Extract the contents from your downloaded zip and save in your Program Files directory or optionally in another directory. I have a directory called ‘Apache Software Foundation’ which I can use to store different versions of Tomcat servers if I need them.
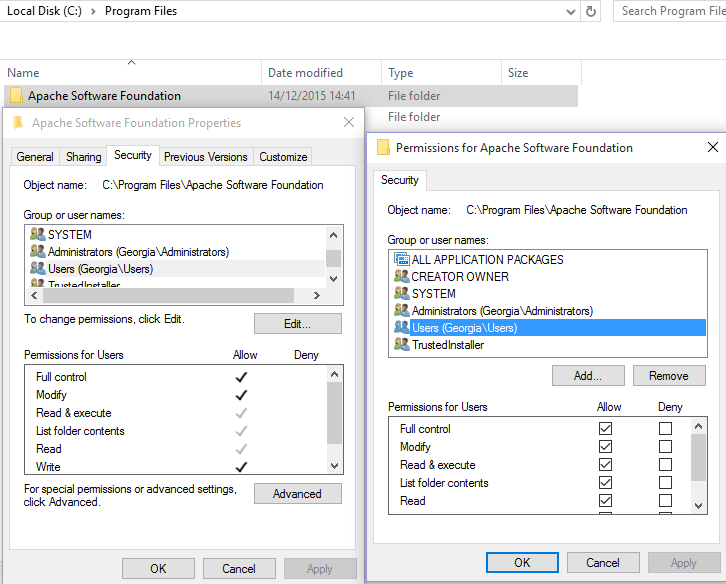
To make sure we have the correct permissions, right-click your top-most Tomcat folder in the Program Files directory and select properties. In the properties window go to the Security tab. Then select your user account name and make sure all of your permissions are set to Allow. If they aren’t go to Edit and tick them and click OK. If these aren’t set then Tomcat may not run correctly.
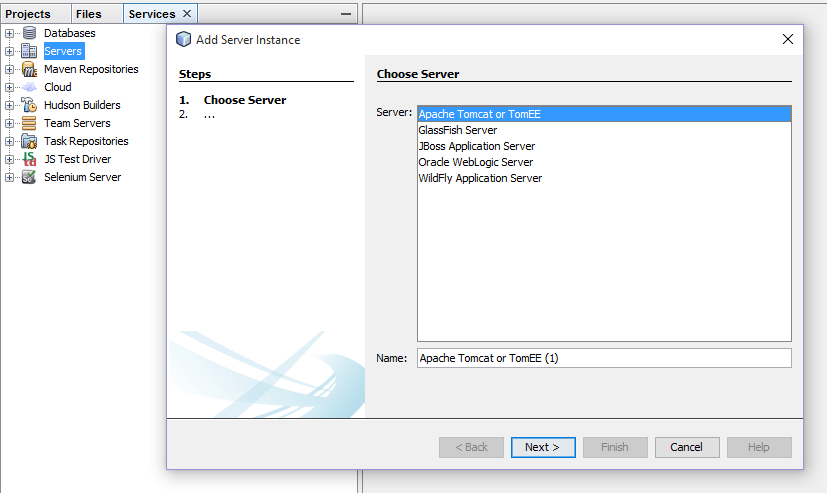
5. Add the Tomcat server to NetBeans
Once you have opened NetBeans go to your Services window. Then right-click on your Servers node and select Add Server. When prompted select Apache Tomcat or TomEE and you can name your server at the bottom. Click Next.
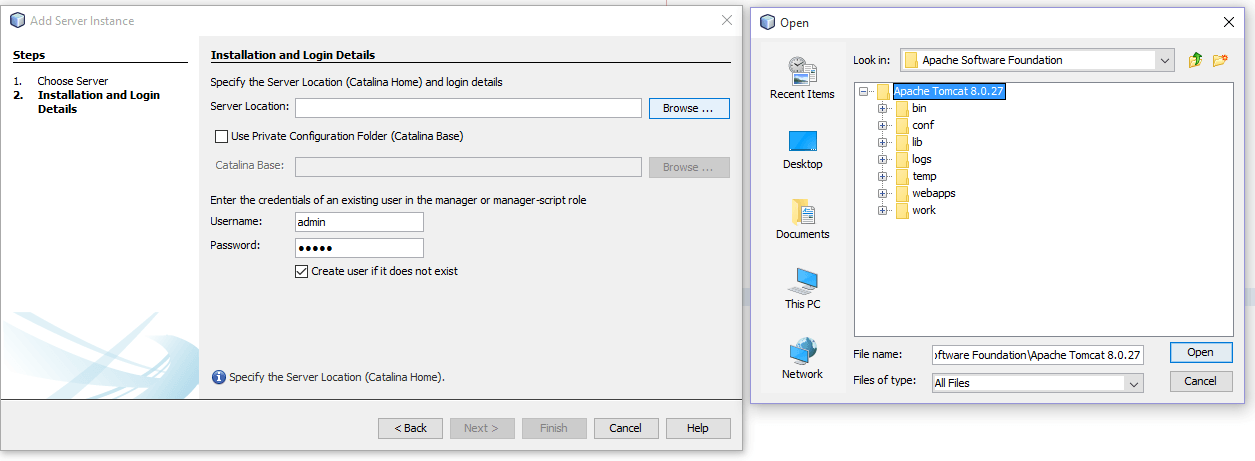
Server location should be the folder containing all of your Tomcat files including the bin, conf and lib folders. Next, you need to create yourself a user account for this server so that you are allocated permissions that allow you to run. deploy projects, etc. To do this you add a username and password and leave Create user if it does not exist ticked which will create the account for you. Click Finish.
Now you have created a Tomcat server instance that appears under the Servers node. Right-click your server and select Start.
Not every time but running Tomcat on Windows may give you a “127.0.0.1 is not recognized as an internal or external command error”. To fix this you need to go to C:\yourServerLocation\bin\catalina.bat and you need to edit this file so open it up in a text editor. Search for the below two snippets and remove the speech-marks.
:noJuliConfig
"JAVA_OPTS=%JAVA_OPTS% %LOGGING_CONFIG%"

:noJuliManager
"JAVA_OPTS=%JAVA_OPTS% %LOGGING_MANAGER%"
Now save your changes. Changing this requires you to delete the server instance you just created on NetBeans because you have changed the server’s configuration. You will have to restart this step again in that case.
Another common error is that NetBeans may not create your server login details correctly. To check this open this file in a text editor: C:\yourServerLocation\conf\tomcat-users.xml. If this is not set correctly, then when you go to deploy an application locally, it will not accept the login credentials you provide. You should edit your tomcat-users section of this file to resemble this:
<tomcat-users xmlns="http://tomcat.apache.org/xml" xmlns:xsi="http://www.w3.org/2001/XMLSchema-instance" version="1.0" xsi:schemaLocation="http://tomcat.apache.org/xml tomcat-users.xsd">
    <role rolename="manager-gui"/>
    <user password="yourPassword" roles="manager-gui,manager-script,admin" username="yourUserName"/>
</tomcat-users>
Again you need to delete your NetBeans instance and add it to NetBeans again and start the server.
One more issue may be if you want to run Tomcat when another process is running on port 8080. You can change this port in your C:\yourServerLocation\conf\server.xml file. Just search for 8080 and change every instance to a different port number e.g. 8085.
6. Create a Web Application
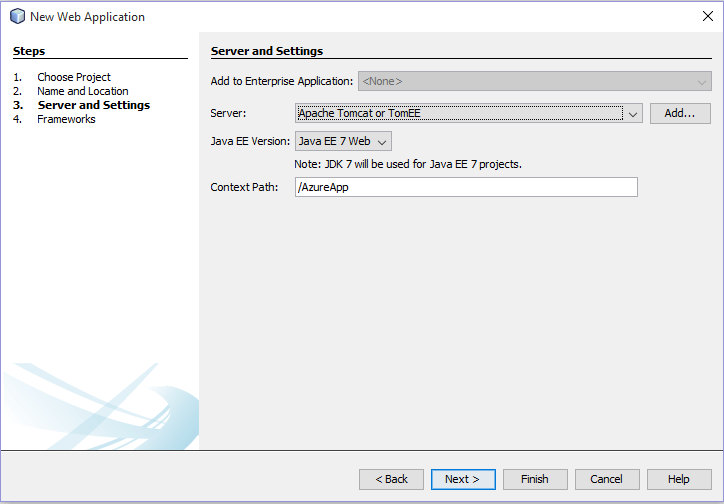
To create a web application go to the Projects window, right-click and select Create New Project. Then in the Java Web category select Web Application. On the next screen name your project. When you come to the Server and Settings page set the Server to the Tomcat server we created in the above steps. The latest Java EE version supported in version 7. Click Finish and your project will be created.
NetBeans has two views to show your web apps files and folders. The Project view will show you the files you will most likely be editing and the Files view will show every file in your project.

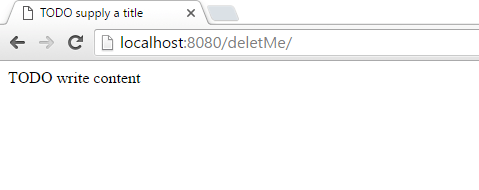
Now that your project and server have been created successfully we can run the application. Select your project’s topmost node and select Run at the top. The first time you do this you will be asked to enter your Tomcat servers log-in credentials. After doing that you should have a new tab open in a web browser with your applications default startup page (index.html if you haven’t edited the project). Mine is displayed below.
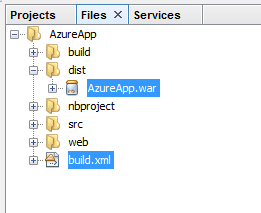
7. Create a WAR file
To create a WAR file go to your File view. Right-click build.xml and go to Run Target and select dist. This will create a dist directory with a WAR file for your application.
8. Deploy to Azure
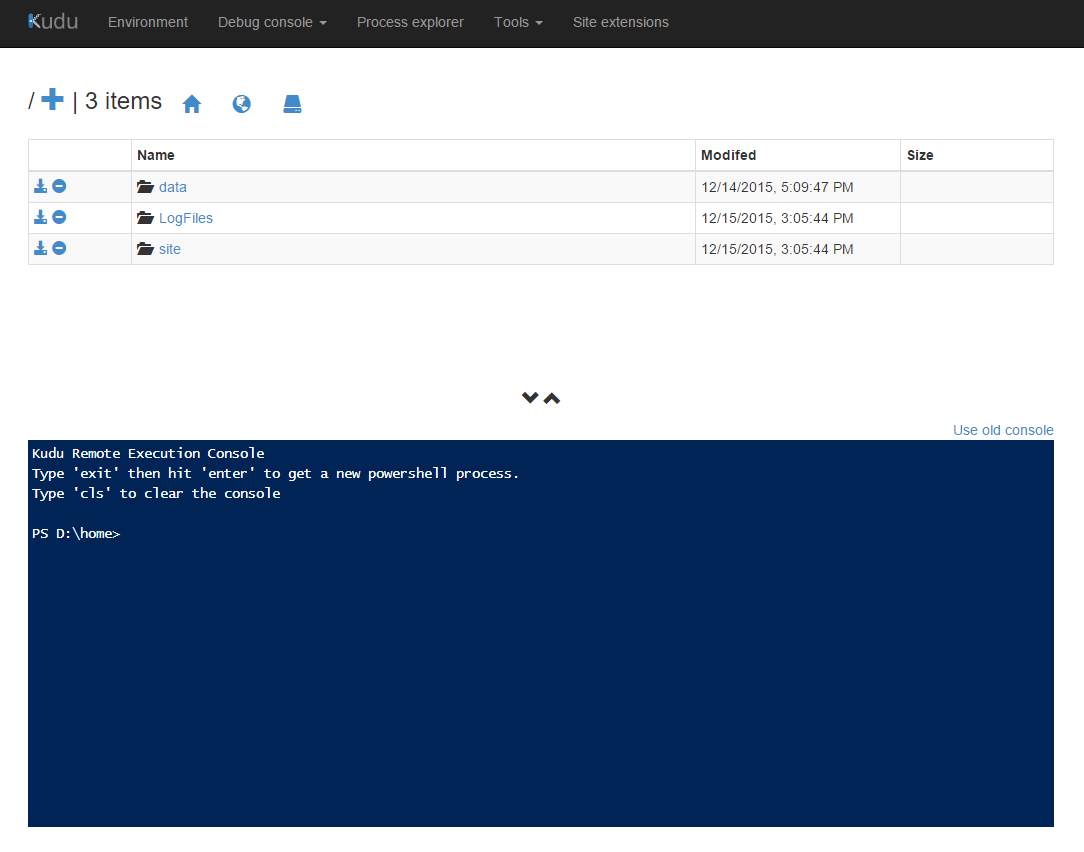
Going back to the Azure Portal now. Select the web application that you created earlier (you can find it under the App Services menu item on the left if you have closed it). Now in your web applications menu select Tools which will open another window. Under the DEVELOP menu select Kudu (which opens yet another window) and click Go. Kudo is a tool that lets you view and modify your server’s file system. We are going to use it to upload the WAR.
Please note that the file system in your Azure server is slightly different to your Tomcat server, especially for Windows users as the Azure server is running on a Linux distribution.
Once Kudu has loaded go to Debug console at the top and select PowerShell. You will see a screen like below. From here you need to open up the following location: site/wwwroot/bin/apache-tomcat-8.0.27/webapps
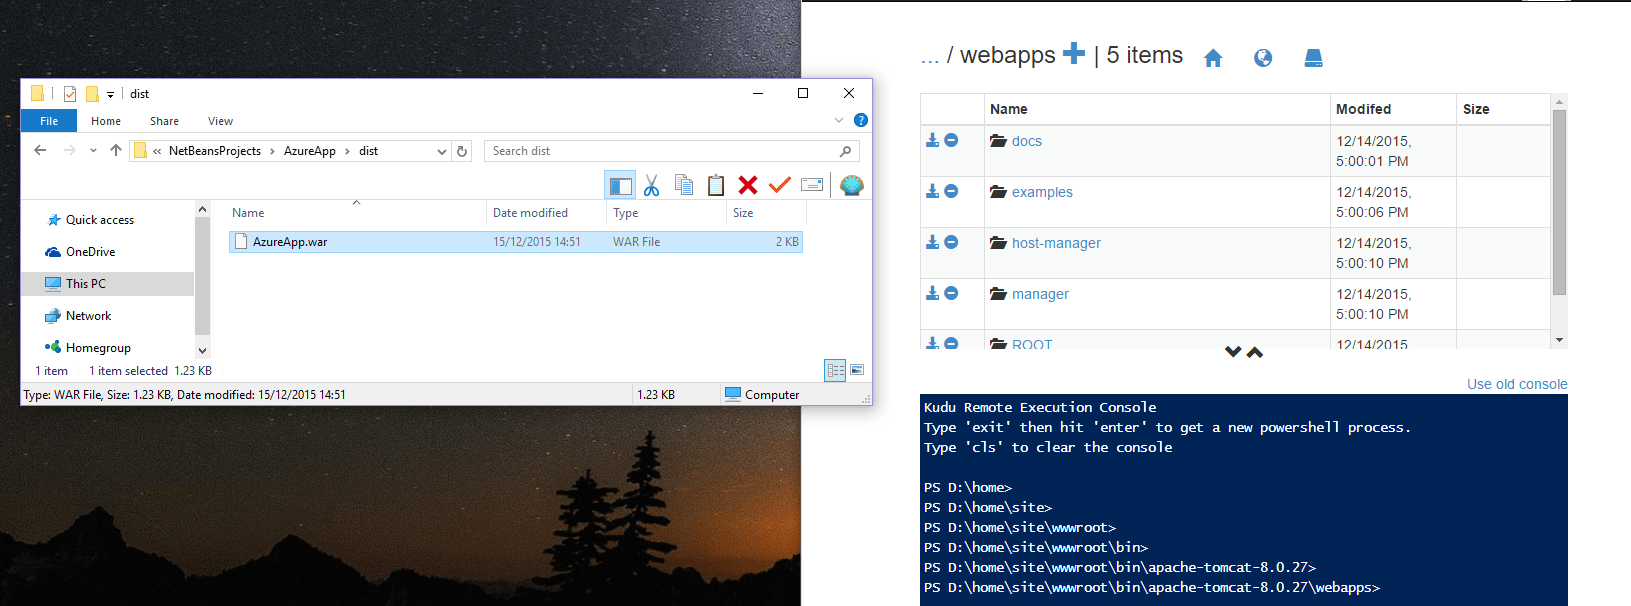
Uploading your WAR is a simple task of dragging it from your project’s dist directory to your Kudu webapps directory. You can drag the WAR over the file system and it will give you two options: either just move or Drag Here to Upload and Unzip. Do not drag your war to the section that says to Upload and Unzip it. We do not want to do this.
Now you need to go back to the Azure Portal and restart the server. You can do this by clicking Restart in your web applications top menu. Once that is completed go to your web application URL: http://globallyuniquetestappname.azurewebsites.net/ and add your project’s name onto the end as by default NetBeans has the context of your application root as the applications name. Mine would be http://globallyuniquetestappname.azurewebsites.net/AzureApp and you should see your deployed application.
Hopefully, you found this guide Tutorial useful, if you have not read my other cloud series articles be sure to check them out below:
- How to set up Amazon Cloud/AWS Elastic Beanstalk on the NetBeans IDE
- How to use the Google App Engine with the NetBeans IDE
If you want to try running Java Software on the Amazon Cloud you can try following these handy tutorials
- How to run BuildVu Converter on the Amazon Cloud
- How to run the JPedal PDF to Image Converter on the Amazon Cloud
- How to run the JPedal PDF to Image Converter on the Azure Cloud
Our software libraries allow you to
| Convert PDF to HTML in Java |
| Convert PDF Forms to HTML5 in Java |
| Convert PDF Documents to an image in Java |
| Work with PDF Documents in Java |
| Read and Write AVIF, HEIC, WEBP and other image formats |
THANK YOU. IT WAS GREAT.
BUT HOW DO I UPLOAD MY SQL DATABASE ? AND CONNECT
Hi Rohit, Microsoft Azure have some information here about how to migrate SQL databases:
https://docs.microsoft.com/en-us/azure/sql-database/sql-database-cloud-migrate
Hi Bethan,
Thank you. I like your way of doing a tutorial. Your tutorial is so detailed and clear with great info.
Keep up your good work.