At IDR Solutions this year, we have decided to carry out a few changes to how we currently operate. One of these changes is to change our Ant based projects to Maven based projects. For those of you who don’t know what Maven is then you can look at these articles to learn more: https://maven.apache.org/what-is-maven.html and https://en.wikipedia.org/wiki/Apache_Maven.
Why should we switch our build automation tool you ask? Well, we have several reasons:
- – To keep our skills current
- – Simpler and easier for new developers to learn and understand. No complicated build script needed.
- – More tools can integrate with Maven
- – Dependency management – When setting up a new computer there are lots of little tasks that need to be carried out before a developer can start tapping away at their keyboard. One of these would be downloading and adding all the relevant jars. Maven would carry out these tasks for you.
I have read a few different tutorials on how to accomplish this conversion but I wanted to keep my old files e.g. build.xml, nbproject folder, etc. without having to move and keep them elsewhere. Having to do this for every project could be tedious, especially if you ever want to convert back to Ant. Most people recommended creating new projects but that could mess up your Source Control Management software so you can’t see your history. I have used a different method which I will explain in the next few steps.
1) Current Projects
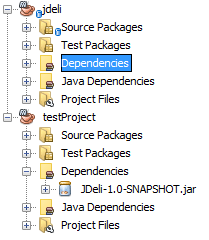
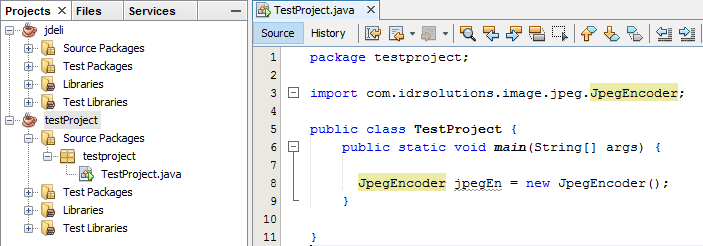
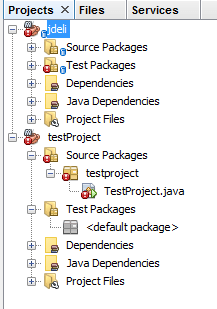
Before I tell you how to do the conversion, I will just show you two projects that I will convert. One project (testProject) uses a class called JPegEncoder from the Jdeli project. Jdeli requires external jars to compile.
2) Rename Ant files
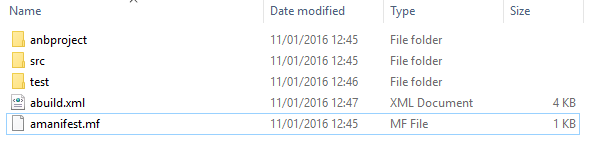
First we want to keep our current NetBeans configuration files but we don’t want to delete or move them, so we are just going to rename them so NetBeans won’t recognize them. Before renaming I would recommend closing the project in NetBeans and closing NetBeans. Leaving either open might create the files again once you rename them. I have attached my file structure below for testProject. You need to rename your nbproject folder and files manifest.mf and build.xml. You don’t technically need to rename manifest.mf because both Ant and Maven use this. Maven will create it’s own if it is needed so rename your current one as you can use it if you ever want to switch back to Ant.
3) Add a POM
Maven projects require a pom.xml in your project directory (where the src and manifest directories are). NetBeans won’t recognize a project that doesn’t have a POM. The easiest way to get a POM is to create a new Maven project and copy it into your current project. You can create a Maven project by right-clicking in your Projects view, selecting New Project, then selecting the Maven category and clicking on Java Application. After pasting it into your current project you will have to edit it. For example for testProject:
<?xml version="1.0" encoding="UTF-8"?>
<project xmlns="http://maven.apache.org/POM/4.0.0" xmlns:xsi="http://www.w3.org/2001/XMLSchema-instance" xsi:schemaLocation="http://maven.apache.org/POM/4.0.0 http://maven.apache.org/xsd/maven-4.0.0.xsd">
   <modelVersion>4.0.0</modelVersion>
   <groupId>com.idrsolutions</groupId>
   <artifactId>testProject</artifactId>
   <version>1.0-SNAPSHOT</version>
   <packaging>jar</packaging>
</project>
4) Re-arrange the source directory
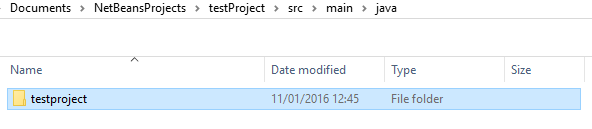
Ant projects have a source directory (src) that contains your packages and classes. Maven uses a slightly different structure: src/main/java and because of this we will have to add these directories and move your current packages into the java directory
Similarly you will have to move any packages in your test directory (if you have any). These will have to be moved to src/test/java.
5) Dependencies
Now you can open your projects in NetBeans and they will be Maven projects. We are almost done now. See how these projects still have errors? The Jdeli project requires some external jars in order to compile and testProject needs Jdeli in order to work.
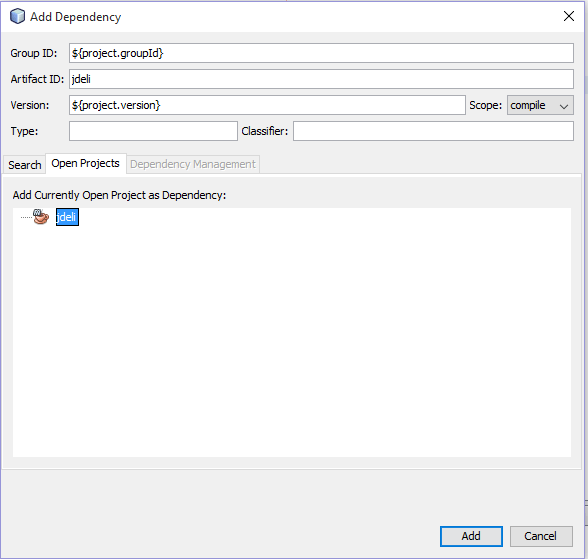
Lets fix testProject first. To do this we need to add a dependency for a local project. Right-click on your testProject’s Dependencies folder in Project view and select Add Dependency. This will open a new window. From there select the Open Projects tab. Here you will see a list of your open projects. Select Jdeli and Add it. Simple and easy.
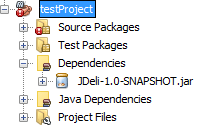
You can see in your testProjects dependencies folder that a new dependency has been added.
The project will still have errors though as we need to fix jdeli, which requires many external jars. I will give you one example so that you will know how this works and add the rest without documenting them. First right-click on your jdeli’s Dependencies folder in Project view and select Add Dependency. Now we are going to search for the jar we need – bcmail. NetBeans links up with the Maven repository and carries out the search and retrieve steps for you.

Select the version you need and select Add at the bottom. Use this process for all of your external jars. Once you have them all proceed onto the next step.
5) Clean and build your projects
Now just clean and build your projects by right clicking their top-most nodes, selecting Clean and Build and voila. From Ant to Maven in 5 simple steps.