
At IDR Solutions I spend a lot of time working with Glassfish. We use it to showcase our BuildVu product in an online PDF to HTML5 converter so it is important for me to keep up to date with the latest technology.
I thought it might be useful to take a look at WebSockets which is a relatively new technology that promises to make websites more reactive by allowing lower latency interaction between users and the server. In this series of articles, I’ll show you some sample applications you can build using WebSockets and Java EE7.
What is WebSocket?
WebSocket is a protocol that allows for communication between the client and the server/endpoint using a single TCP connection. Sounds a bit like HTTP, doesn’t it? The advantage WebSocket has over HTTP is that the protocol is full-duplex (allows for simultaneous two-way communication) and its header is much smaller than that of an HTTP header, allowing for more efficient communication even over small packets of data.
The life cycle of a WebSocket is easy to understand as well:
- The client sends the Server a handshake request in the form of an HTTP upgrade header with data about the WebSocket it’s attempting to connect to.
- The Server responds to the request with another HTTP header, this is the last time an HTTP header gets used in the WebSocket connection. If the handshake was successful, they server sends an HTTP header telling the client it’s switching to the WebSocket protocol.
- Now a constant connection is opened and the client and server can send any number of messages to each other until the connection is closed. These messages only have about 2 bytes of overhead.
A Simple Example
The WebSocket API was introduced with Java EE7, in this example, we’ll create a client which will send a message to the server and the server will send it back.
For this example, I’ll be using the NetBeans 7.4 and the Glassfish 4 server, which comes bundled with NetBeans.
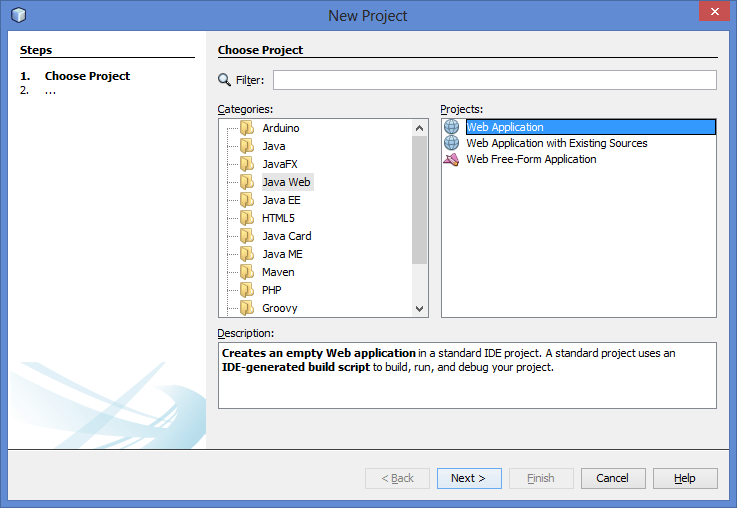
Setting up the Project
Open the New Project Wizard, choose Java Web and select Web Application. Select next, name your project and choose its save location and press next.
Make sure your chosen server is the name of your GlassFish server and that the Java EE version you’re working with is 7 or above and press finish.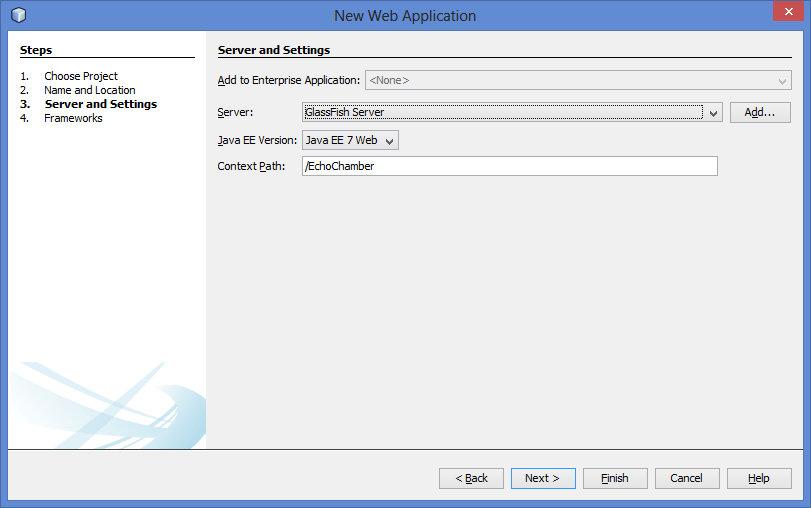
Your project should now be generated. Now, we’ll build the Server Endpoint which will handle incoming WebSocket messages.
In your project go to “Source Packages” and create a new Java class. The server endpoint is a Plain Old Java Object (POJO) which uses Java’s annotations to define its methods (This can be done programmatically but looks much cleaner using annotation). This is the code for the endpoint:
import java.io.IOException;

import javax.websocket.OnClose;
import javax.websocket.OnMessage;
import javax.websocket.OnOpen;
import javax.websocket.Session;
import javax.websocket.server.ServerEndpoint;

/**
 * @ServerEndpoint gives the relative name for the end point
 * This will be accessed via ws://localhost:8080/EchoChamber/echo
 * Where "localhost" is the address of the host,
 * "EchoChamber" is the name of the package
 * and "echo" is the address to access this class from the server
 */@ServerEndpoint("/echo")
public class EchoServer {
    /**
     * @OnOpen allows us to intercept the creation of a new session.
     * The session class allows us to send data to the user.
     * In the method onOpen, we'll let the user know that the handshake was
     * successful.
     */    @OnOpen
    public void onOpen(Session session){
        System.out.println(session.getId() + " has opened a connection");
        try {
            session.getBasicRemote().sendText("Connection Established");
        } catch (IOException ex) {
            ex.printStackTrace();
        }
    }

    /**
     * When a user sends a message to the server, this method will intercept the message
     * and allow us to react to it. For now the message is read as a String.
     */    @OnMessage
    public void onMessage(String message, Session session){
        System.out.println("Message from " + session.getId() + ": " + message);
        try {
            session.getBasicRemote().sendText(message);
        } catch (IOException ex) {
            ex.printStackTrace();
        }
    }

    /**
     * The user closes the connection.
     *
     * Note: you can't send messages to the client from this method
     */    @OnClose
    public void onClose(Session session){
        System.out.println("Session " +session.getId()+" has ended");
    }
}
And the code for the client, which goes into the index.html. In the project view navigate to Web Pages and open index.html this should be some generic HTML. I will be using HTML/Javascript to control the client-side. There is a standard API for WebSockets in JavaScript and is supported by most modern browsers. In index.html replace the code with the following:
edit: As pointed out in the comments, the undefined connection appears to be a bug in certain browsers.
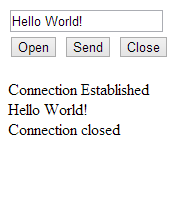
All that’s left to do now is run the server. In NetBeans right-click the project directory and select run, this will start up Glassfish and deploy the application to the server. Your default browser should now open a new page where you can start using the client above. To open the connection press open, type something into the text box and press send. When your done press the close button.
Your client should look something like this:
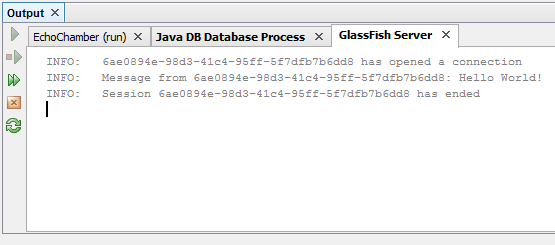
And to prove it’s not just smoke and mirrors, here’s the output from the server, the hex string shown is the ID of the client:
And there you have it, how to create a simple Echo application using web sockets in Java EE7. In my next article, I’ll use WebSockets to transport more important information, images of our pets.
Got any comments or questions? Leave them below.
If you would like to read more articles on Servers you should try:
- How to use the Google App Engine with the NetBeans IDE
- How to set up Amazon Cloud/AWS Elastic Beanstalk on the NetBeans IDE
- How to use the Microsoft Azure Cloud on the NetBeans IDE
- Top 10 Open Source Java and JavaEE Application Servers
If you want to try running Java Software on the Amazon Cloud you can try following this handy tutorial:
We now have a series of articles on what is new in Java 9: