
WordPress is one of the most popular content management systems on the internet. Created using PHP it can handle all things blogging to commercial websites. In fact we use WordPress for both our blog and website. In this article I’ll show you how to create a WordPress plugin which creates a menu item and corresponding page in the admin console.
Hello World!
Let’s dive right in with a simple plugin that will say “Hello World!” on all the pages.
The header comment here is what the wordpress uses to recognise that this is a plugin, it is only needed for the point of entry of the plugin (other php files get called with include/require_once). At the bare minimum you need to have “Plugin Name” in the header for it to be listed in the plugin subdirectory. Now to save the file, make sure it’s in the sub folder of your wordpress installation “wp-content/plugins”, I suggest placing it into a subdirectory there so that you can organise your plugin.
To turn on the plugin, go to the wordpress admin panel and go to the “Plugins” menu option. Find the new plugin and activate it.

Now on every page of the website it will say “Hello world!” at the top left.
It’s not very practical, but it gives an insight into how WordPress plugins work. WordPress handles plugins in a manner that allows them to be as pluggable as possible. When a plugin is activated, WordPress will run the main php file of the plugin. This means that we need to lock down when our plugin will be active.
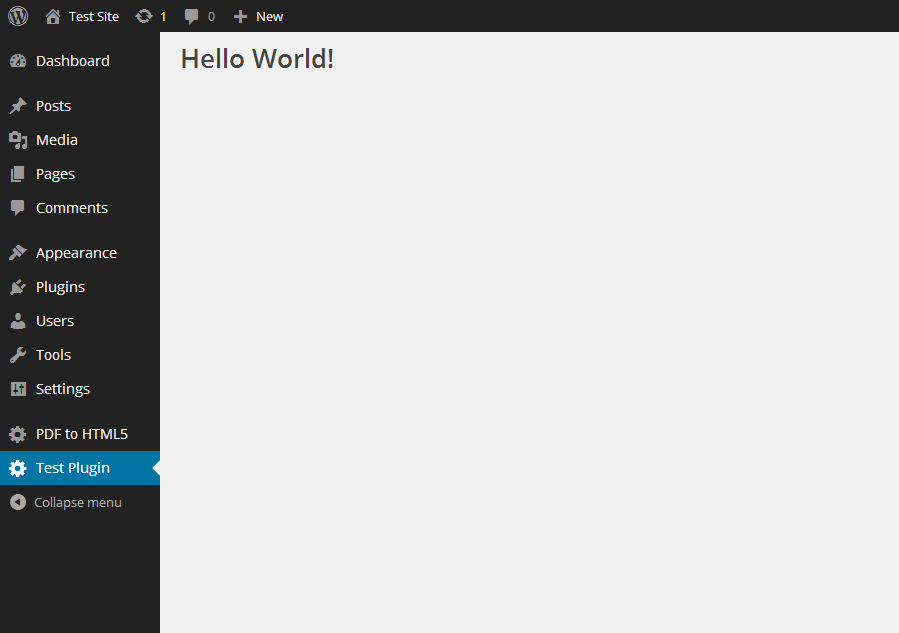
Creating a New Admin Panel
Now that we know how to get a plugin recognised by WordPress, we can continue on to creating a proper plugin that does something useful. A good starting point would be to have a menu item on the sidebar, allowing us to have a page in the admin console. This is useful for allowing the admin of a wordpress site configure your plugin.
To do this, we need to hook into the action where the admin menu is loaded. When WordPress loads a page, it runs through a set of actions which we can hook into with the add_action function. In the following code we create a menu item in the admin panel which takes us to a page which says “Hello World!”:
Let’s take a look at the functions:
add_action(‘admin_menu’, ‘test_plugin_setup_menu’);
Here we hook into the point where the menu bar on the admin panel starts loading and tell wordpress that we want to run the function ‘test_plugin_setup_menu’, which is a few lines below.
add_menu_page( ‘Test Plugin Page’, ‘Test Plugin’, ‘manage_options’, ‘test-plugin’, ‘test_init’ );
Here is where we add the menu page and the menu item entry. The first option ‘Test Plugin Page’ is the title of our options page. The second parameter ‘Test Plugin’ is the label for our admin panel. The third parameter determines which users can see the option by limiting access to certain users with certain capabilities. ‘test-plugin’ is the slug which is used to identify the menu. The final parameter ‘test_init’ is the name of the function we want to call when the option is selected, this allows us to add code to output HTML to our page. In this case we just write out “Hello World!”.
Now that we have setup our options page, we have a staging ground to play with some more features of WordPress.
Next time I’ll show you how to use a Web Service with your plugin.
For more information on creating plugins for WordPress, I recommend checking their official Codex, which is very well documented.