In my previous tutorial, we were left with a WebSocket server endpoint which bounced back our message. In this tutorial I will show you how to make a chat system using websockets which can handle multiple users, send text and more importantly, send people pictures of my pet, aptly named Socket. I’ll also be breaking an IDR Solutions golden rule by not using a picture of a cat (Although Socket gives cats a run for their money in laziness).
Multiple User Chat
So without further ado, let’s jump into the WebSocketEndpoint class. The simplest way to do this is to keep a collection of all the connected users. This is where Java’s Set class comes into play, allowing us to keep a list of unique sessions. So at the top of the class insert the set:
private static final Set<Session> sessions = Collections.synchronizedSet(new HashSet<Session>());
By iterating trough this set we can iterate through all the connected sessions and send them the same message. To simplify this, insert a new method into the class:
    private void sendMessageToAll(String message){
        for(Session s : sessions){
            try {
                s.getBasicRemote().sendText(message);
            } catch (IOException ex) {
                ex.printStackTrace();
            }
        }
    }
Using a set also makes managing sessions very easy, when we get a new connection, we add the session to the set and when the session ends, we remove it.
    @OnOpen
    public void onOpen(Session session){
        System.out.println(session.getId() + " has opened a connection");
        sendMessageToAll("User has connected");
        try {
            session.getBasicRemote().sendText("Connection Established");
        } catch (IOException ex) {
            ex.printStackTrace();
        }
        sessions.add(session);
    }
    @OnClose
    public void onClose(Session session){
        sessions.remove(session);
        System.out.println("Session " +session.getId()+" has ended");
        sendMessageToAll("User has disconnected");
    }
Thanks to the sendMessagesToAll() method, we can also modify our onMessage method to:
@OnMessage
public void onMessage(String message, Session session){
System.out.println("Message from " + session.getId() + ": " + message);
sendMessageToAll(message);
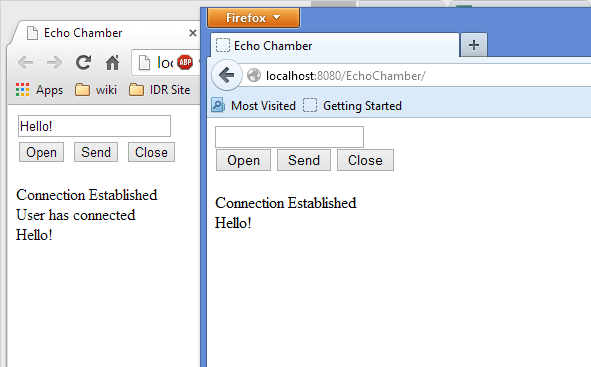
}Now when we deploy this to the server and load the web page, we can talk to other users.
Sending Images
Now where do images come into this? The easiest way to do this is to modify the client to send the image data as a string and to place it into an image element when we get the message. This comes at a major disadvantage though, we’ll lose the ability to send text via the endpoint, more on this later. The first thing to do it to change the type of input from “text” to “input”.
Next, we need to modify our send function to handle the image:
function send(){
    var file = document.getElementById("messageinput").files[0];

    var reader = new FileReader();
    // Sends the result of the file read as soon as the reader has
    // completed reading the image file.
    reader.onloadend = function(){
        webSocket.send(reader.result);
    };
    // Make sure the file exists and is an image
    if(file && file.type.match("image")){
        reader.readAsDataURL(file);
    }

}
We also need to update the writeResponse() method:function writeResponse(image){
messages.innerHTML += "
" + "<img alt="" src='" + image + "' />";
}
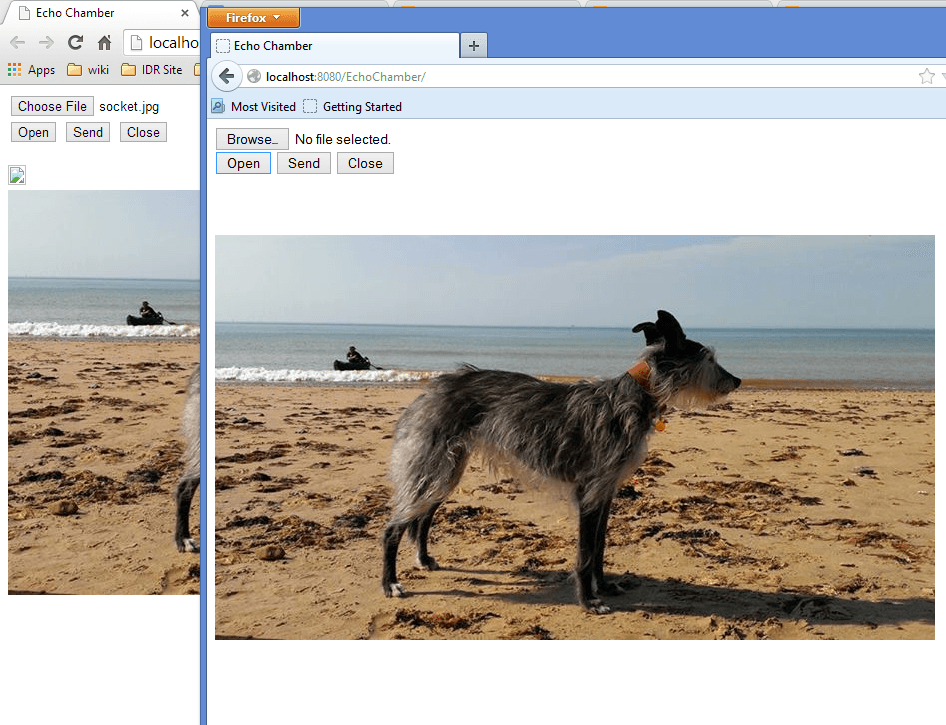
Now when we send an image we get the following:
So, how do we send both text and images over websockets I hear you ask…
Json, Encoders and Decoders
One of the easiest ways is to send off data as a string of Json and let the server handle it.
Server Side
The first thing we should do is set up the server endpoint to handle the incoming Json. For this we need to create three classes; The Json wrapper class, the Encoder class and the decoder class.
The wrapper class is needed as we can use the @OnMessage annotated method to accept the object as a method as the decoder class will handle the conversion from String to our object. The wrapper class is a simple java class with a modified toString() method, which will convert the JsonObject to a string representation, which is sent back to the users as a string via the encoder class.
package com.simon.websocket.data;

import java.io.StringWriter;
import javax.json.Json;
import javax.json.JsonObject;

public class Message {
    private JsonObject json;

    public Message(JsonObject json) {
        this.json = json;
    }

    public JsonObject getJson() {
        return json;
    }

    public void setJson(JsonObject json) {
        this.json = json;
    }

    @Override
    public String toString(){
        StringWriter writer = new StringWriter();

        Json.createWriter(writer).write(json);

        return writer.toString();
    }

}
The MessageDecoder class implements the Decoder.Text<T> interface.
package com.simon.websocket.data;

import java.io.StringReader;
import javax.json.Json;
import javax.json.JsonException;
import javax.json.JsonObject;
import javax.websocket.DecodeException;
import javax.websocket.Decoder;
import javax.websocket.EndpointConfig;

/**
 * Decodes a client-sent string into a Message class
 */public class MessageDecoder implements Decoder.Text{
    /**
     * Transform the input string into a Message
     */    @Override
    public Message decode(String string) throws DecodeException {
        JsonObject json = Json.createReader(new StringReader(string)).readObject();
        return new Message(json);
    }

    /**
     * Checks whether the input can be turned into a valid Message object
     * in this case, if we can read it as a Json object, we can.
     */    @Override
    public boolean willDecode(String string) {
        try{
            Json.createReader(new StringReader(string)).read();
            return true;
        }catch (JsonException ex){
            ex.printStackTrace();
            return false;
        }
    }

    /**
     * The following two methods are placeholders as we don't need to do anything
     * special for init or destroy.
     */    @Override
    public void init(EndpointConfig config) {
        System.out.println("init");
    }
    @Override
    public void destroy() {
        System.out.println("destroy");
    }

}
And our MessageEncoder class, which prepares the message object for transmission to the clients. It implements the interface Encoder.Text<T>.
package com.simon.websocket.data;

import javax.websocket.EncodeException;
import javax.websocket.Encoder;
import javax.websocket.EndpointConfig;

/**
 * Converts the message class to a string.
 */public class MessageEncoder implements Encoder.Text {

    @Override
    public String encode(Message message) throws EncodeException {
        return message.getJson().toString();
    }

    @Override
    public void init(EndpointConfig config) {
        System.out.println("Init");
    }

    @Override
    public void destroy() {
        System.out.println("destroy");
    }

}
We now need to set up our actual endpoint so that it knows to use our new classes. Below is what our Endpoint now looks like. Some things to note are:
- The @ServerEndpoint annotation has been modified to declare that we can use MessageEncoder/Decoder as Encoders and Decoders respectively.
- Session.getBasicRemote().sendMessage() has become sendObject()
- All communication between the Endpoint and Sessions is done using Json via the Message class.
- onMessage() now takes in a Message parameter instead of a String.
import com.simon.websocket.data.Message;
import com.simon.websocket.data.MessageDecoder;
import com.simon.websocket.data.MessageEncoder;
import java.io.IOException;
import java.util.Collections;
import java.util.HashSet;
import java.util.Set;
import javax.json.Json;
import javax.websocket.EncodeException;

import javax.websocket.OnClose;
import javax.websocket.OnMessage;
import javax.websocket.OnOpen;
import javax.websocket.Session;
import javax.websocket.server.ServerEndpoint;

/**
 * @ServerEndpoint gives the relative name for the end point
 * This will be accessed via ws://localhost:8080/EchoChamber/echo
 * Where localhost is the address of the host
 */@ServerEndpoint(value="/echo", encoders = {MessageEncoder.class}, decoders = {MessageDecoder.class})
public class EchoServer {
    // This might not look right as wordpress hates angle brackets.
    private static final Set sessions = Collections.synchronizedSet(new HashSet());

    /**
     * @OnOpen allows us to intercept the creation of a new session.
     * The session class allows us to send data to the user.
     * In the method onOpen, we'll let the user know that the handshake was
     * successful.
     */    @OnOpen
    public void onOpen(Session session){
        System.out.println(session.getId() + " has opened a connection");

        Message message = new Message(Json.createObjectBuilder()
            .add("type", "text")
            .add("data", "User has connected")
            .build());
        sendMessageToAll(message);

        try {
            Message connectedMessage = new Message(Json.createObjectBuilder()
            .add("type", "text")
            .add("data", "User has connected")
            .build());
            session.getBasicRemote().sendObject(connectedMessage);
        } catch (IOException | EncodeException ex) {
            ex.printStackTrace();
        }
        sessions.add(session);
    }

    /**
     * When a user sends a message to the server, this method will intercept the message
     * and allow us to react to it. For now the message is read as a String.
     */    @OnMessage
    public void onMessage(Message message, Session session){
        System.out.println("Message from " + session.getId() + ": " + message);
        sendMessageToAll(message);
    }

    /**
     * The user closes the connection.
     *
     * Note: you can't send messages to the client from this method
     */    @OnClose
    public void onClose(Session session){
        sessions.remove(session);
        System.out.println("Session " +session.getId()+" has ended");
        Message message = new Message(Json.createObjectBuilder()
            .add("type", "text")
            .add("data", "User has disconnected")
            .build());
        sendMessageToAll(message);
    }

    private void sendMessageToAll(Message message){
        for(Session s : sessions){
            try {
                s.getBasicRemote().sendObject(message);
            } catch (IOException | EncodeException ex) {
                ex.printStackTrace();
            }
        }
    }
}
Client Side
We now need to modify our client html to send and receive Json objects. While we’re at it I also added inputs for both images and text. The things to note in here are:
- send() has been split into sendImage() and sendText() which converts an image or text respectively into Json and sends it to the server.
- writeResponse has been modified to receive json as a string and process it according to the type parameter.
With this we can now send text and images using websockets.
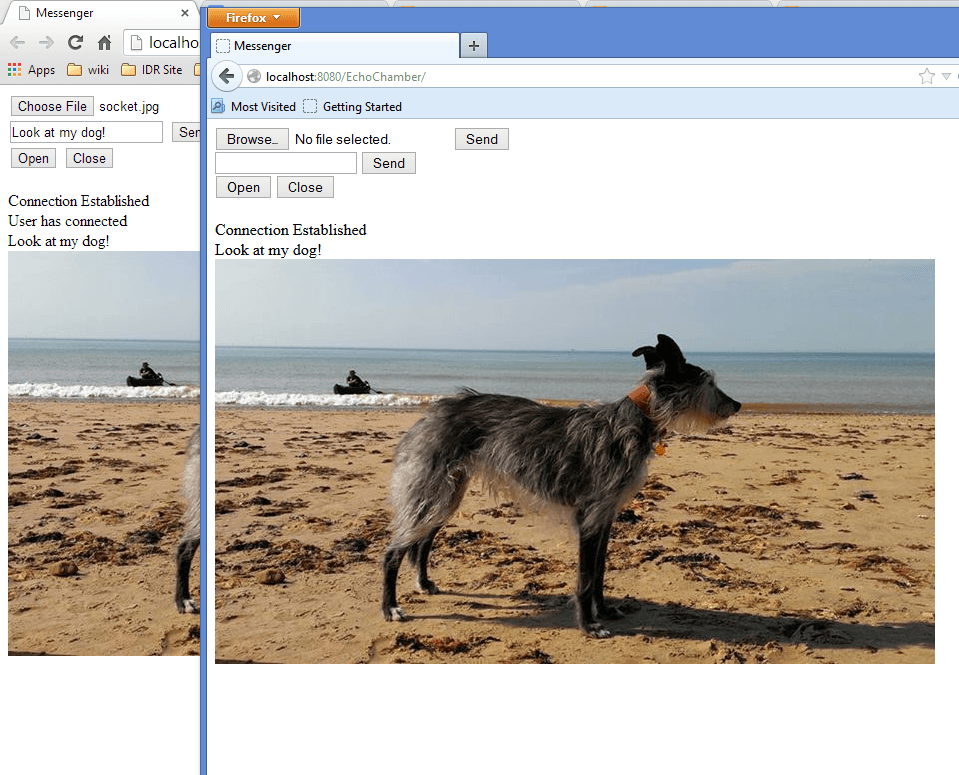
And now we have a chat client which can send both text and images via websockets. Got any comments? leave them below.
If you want to see the full source code, check out my GitHub repository.
Our software libraries allow you to
| Convert PDF files to HTML |
| Use PDF Forms in a web browser |
| Convert PDF Documents to an image |
| Work with PDF Documents in Java |
| Read and write HEIC and other Image formats in Java |
Hey Simon, is it possible to create a login for connection into websocket room where the user’s name shows up on a chat list displaying their name. And when they type it can show “user1 is typing”?
You can build pretty much anything with JSON.
Hello again,
I started with your previous tutorial and wanted to create user list on my own. Created user class, made array list of users. But then I realized that EchoServer object is different for every connected user. It’s not aware of other connected users. I wanted to related every session id to username (my user class contains those pairs – user name and session id) and it’s working well, except..I ended up with bunch of single element lists. Every user has it’s own list containing only his user element. My question is – how can I have some global list, which will be shared among the all connections?
I can save to database or to file..but there must be a better solution. When I checked this tutorial it’s title gave me some hope, that I’ll find solution here. But it’s just iterating trough the list of sessions.
Or, other way, can I somehow add extra (username) field to the session?
Oh god, this is embarrassing. I just had to make my list static. 🙂
Again, you don’t have to publish my previous question.
Hi Milang,
We all make those mistakes and it is really helpful for others to know what the pitfalls are. Thanks for your help.
I have a scenario where I will have 200 or so users and each will have their own session connected. I don’t have a need to send the same message to all users, in fact, the information passed will be unique per that user. Do I still need to maintain a set of sessions for that or will java just know that the session is already active and use it. Sorry if this is a stupid question, I am just new to websockets and I’m trying to learn how they work.
Thanks
java servers do know it (but be aware that servers may have session timeout defined somewhere Ex: Glassfish, so you have to customize it before deploying your application)
Simon. Thank you so much. You have solved my issue of sockets and now Realtime applications are possible and the rest is left to imagination.
Thank you and we will be teaching others on sockets to make our community more effective
Thank you once again!
Hi guys,
nice tutorial indeed! thank you very much for sharing it.
Some issues I encountered while trying to set it up:
I had to move to Tomcat 7.0.62 from Tomcat 7.0.42 to have it working
I can send images if they are small, otherwise (at least on Chrome 43.0.2357.81 m) I get an unexpected close event with code 1006 – I think it is related to the settings for org.apache.tomcat.websocket.binaryBufferSize (see Tomcat documentation)
I am trying to play with the servlet context parameters but no success so far…
TestWebSockets
chat.html
org.apache.tomcat.websocket.binaryBufferSize
5242880
org.apache.tomcat.websocket.textBufferSize
51200
Any hint by chance?
Cheers,
Stefano
Did you check maximum connection timeout ; which also may impact
what is the image size you are testing (it would be helpful me to reproduce the error on my site and provide you the solutions)
Is maximum connection timeout a specific Tomcat parameter as well?
Any image exceeding 80kb fails…
Hi Stefano
if you provide me the version number of tomcat you are running i could reproduce the issue on my end and will come up with a solution
Tomcat 7!