The Raspberry Pi is not a very powerful device, however as it is so flexible, it is a very useful machine to have to test programs on. However actually programming and building your programs on the Pi itself would be far too time-consuming to make the testing worthwhile.
NetBeans solves this problem with ease by allowing you to program and build your projects on your usual machine (likely a lot more powerful than the Pi!) and then send and run the built project on the Pi. Programs such as PuTTy aren’t necessary as NetBeans does all the work for you – that means no SSH setup required! Your program then runs on the Pi as you would expect but with the added bonus of all outputs and debugging information being sent back to your machine where it is displayed in the normal Output window.
I’m now going to show you how to do this by deploying our Java PDF Library SDK to the Pi.
Requirements:
- – NetBeans 8.0 or greater.
- – Raspberry Pi running Java 1.8.0 (with JavaFX installed)
- – Both the development machine and the Pi need to be connected to the Internet (I connected them both to them same network)
- – A NetBeans project that you want to deploy to the Pi
Steps:
- Setup the connection between the Pi:
- – Open the Project Properties window of the project you want to deploy
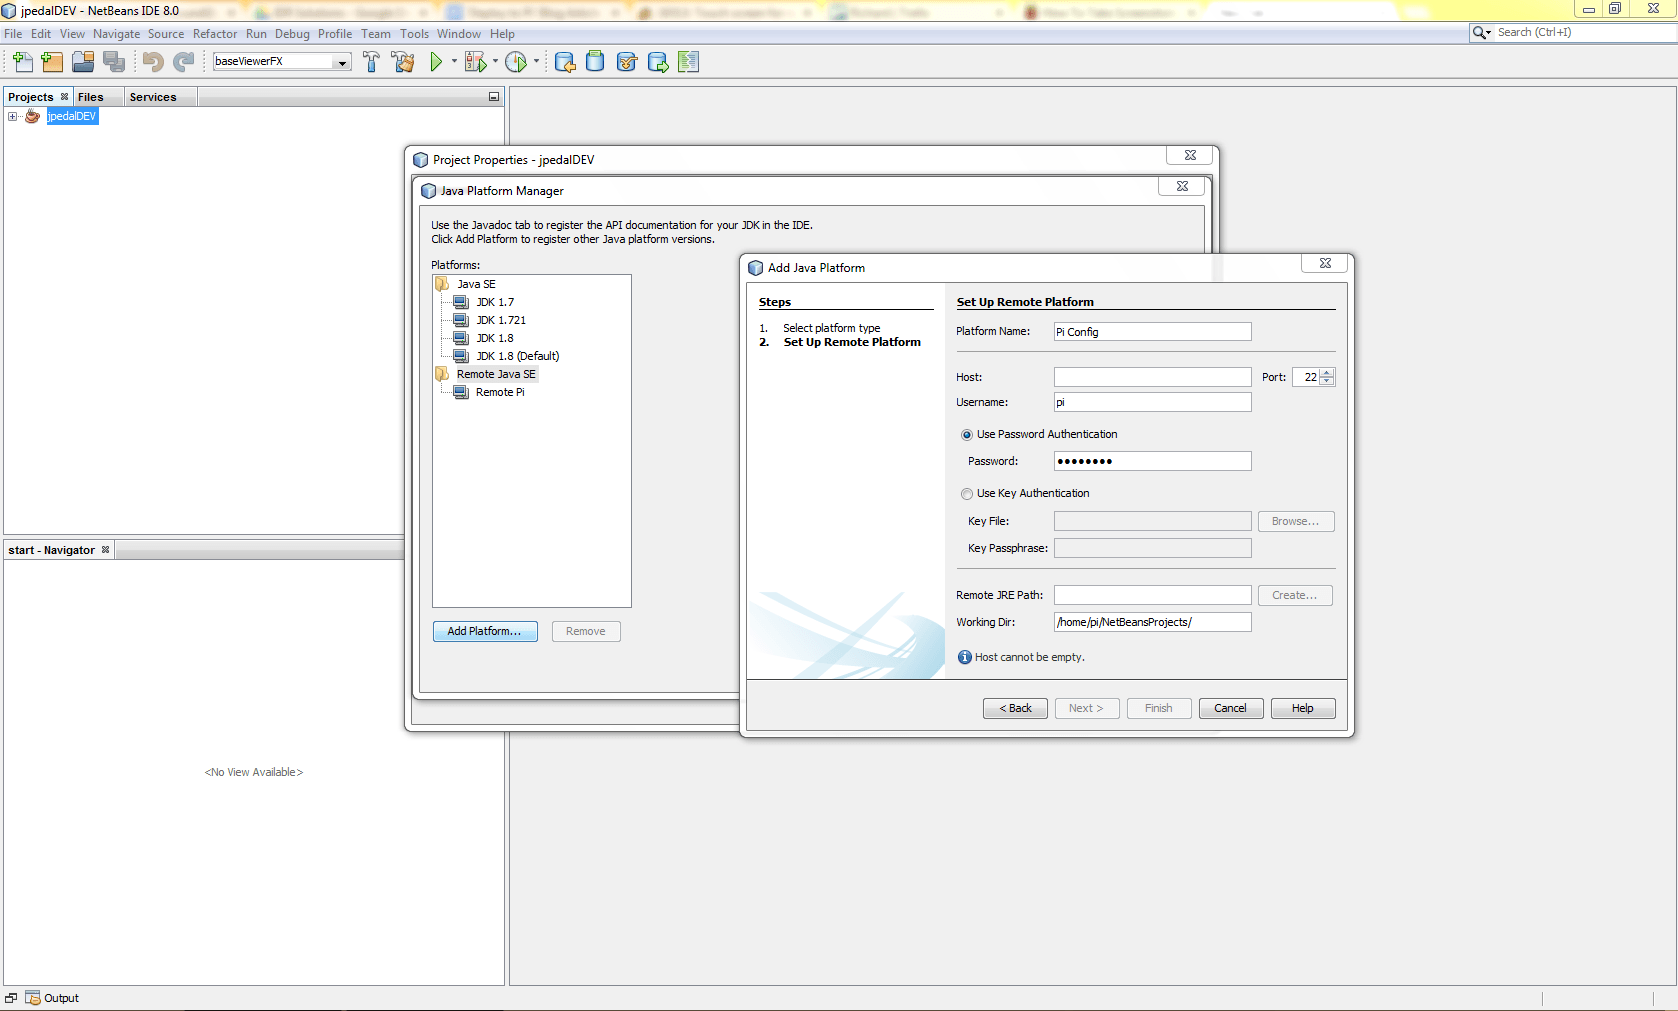
- – Select the Run tab, click Manage Platforms then Add Platform
- – We then select Remote Standard Java Edition and proceed to fill out the form
- – I’m going to give it a Platform Name of “Pi Config”
- – The Host field is for the IP address of the Pi
- – The default Username is “pi” and the Password “raspberry”, but if you have changed the login options on the Pi, then you will need to change those here as well
- – The Remote JRE Path for our Pi was: “/usr/lib/jvm/jdk-8-oracle-arm-vfp-hflt/jre/bin/java”, but it might well be different on yours. Once all the boxes are filled in, click finish to complete the setup. If NetBeans says it can’t connect to the host, then verify that all the fields contain the correct information

- – NetBeans will now ask you for a name for the Runtime Platform. Call it Remote Pi.
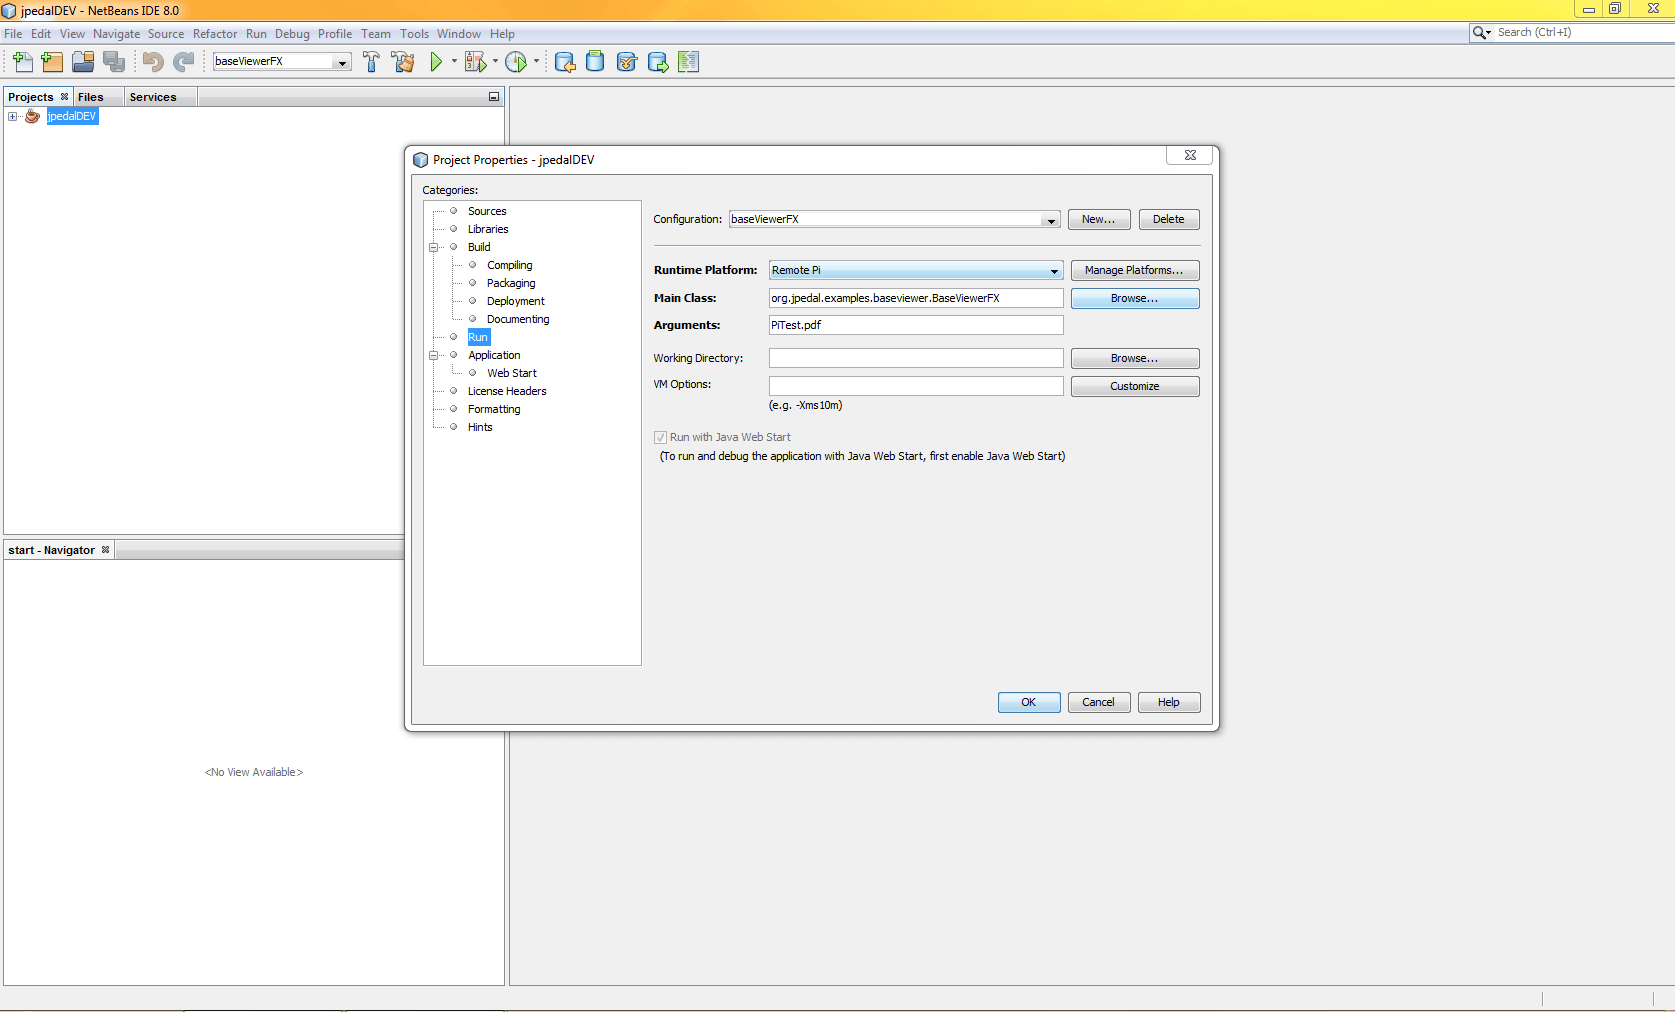
- 2. You should now be taken back to the Run tab of Project Properties where we are now going to finish the configuration of the project:
- – Make sure the Runtime Platform is “Remote Pi”
- TIP: If you ever want to run the project on your local machine rather than the Pi, just change the Runtime Platform to the default via the drop-down menu
- – I have added an argument so the PDF viewer opens a PDF file automatically, however your project may not need this.
- – Make sure the Runtime Platform is “Remote Pi”

Thats it for the configuration of the project. Now we just need to run the program!
To do this, firstly make sure the Pi hasn’t been booted to the desktop. If you are on the desktop, logging out should return you to the correct command line. Now all you need to do is hit Run in NetBeans and your project should magically appear on the Pi!
I hope you’ve enjoyed our article, please let us know in the comments below.
Our software libraries allow you to
| Convert PDF files to HTML |
| Use PDF Forms in a web browser |
| Convert PDF Documents to an image |
| Work with PDF Documents in Java |
| Read and write HEIC and other Image formats in Java |
Thank you for this article.
I install jdk1.8.0_06-oracle-arm… sucessfully without javafx. If i am right is fx optional.
Java -version have show me a the right version.
My Netbeans 8 configuration for a new project does not work until now.
I checked the right jre path but i think the connection may be blocked.
Do you know what Kind of protocol netneans use for this.?
FX is part of Java 8 so should not effect it.
I installed this today, and other than having to put the jre path in WITHOUT the trailing /bin/java … it appeared to test fine on my pi’s.
However, I cannot compile and run on them, because netbeans says that
ant -f C:\\ThrowARockLibrary -Dremote.platform.password=***** -Dremote.platform.rp.target=linuxarmvfphflt-15 -Dremote.platform.java.spec.ver=18 -Dremote.platform.rp.filename=linuxarmvfphflt -Dnb.internal.action.name=run run-remote
Target “run-remote” does not exist in the project “ThrowARockLibrary”.
BUILD FAILED (total time: 0 seconds)
What did I do wrong??? What do I need to add to what to make thisrun.
Ok, solved problem,… you cannot use an EXISTING project. Oce I created a NEW version of the library, and before I did my first compile, I set up the remote … It now works as expected.. almost.
I can run the project, and the targetted class will run on the remote device. But if I do a run file.. the run file is executed on the local device. Is this a bug, or is there something else i missed???
Thanks..
Any chance you could elaborate on this. I am having the same problem, but can’t seem to resolve it. I can seem to run a clean build, but when i do a run, it gives me this error and stops short of porting the files over to the raspberry.
You should also state that only ANT-based projects are supported right now (NetBeans 8.0.2). No Maven-support yet.
Thanks for pointing out. It is also really nice to see that the Pi 2 is able to run NetBeans and could make a really good Java deployment platform for lots of projects.
I am using a maven based project. Do you know how I could debug that type of project on the PI. It seems I cannot change the runtime platform, I don’t see that Option?
The NetBeans deploy option is tied to NetBeans. On a generic Maven project you will probably need to use standard remote debugging tools/techniques.
When I try to run the sample anagram game I get the following exception:
Exception in thread “AWT-EventQueue-0”
java.awt.HeadlessException:
No X11 DISPLAY variable was set, but this program performed an operation which requires it.
Any ideas on how I set the display variable?
Do you have the PI plugged into a monitor?
Yes, I’ve got a monitor and the program runs fine when executed from the command line on the pi, or from x windows. Doesn’t seem to matter if x windows is running on the pi or not. If I try to run it remotely it gives the exception, locally no exception.
Thanks
I’ve also tried using Putty to connect from my windows machine. I ran the java program from the command line in the dist directory on the pi and got the same headless exception. I then tried X-11 forwarding enabled, which I saw somewhere may help, but didn’t. It appears to be a SSH issue. It almost appears that the java program expected to find an X server on my windows machine.
It would need that in order to access it.
Hi, This article is great!
I’m hoping to remotely deploy a python application from netbeans to the Rasberry Pi which features OpenCV and numpy libraries. I understand you were using java but do you know if I will need to download OpenCV and numpy on the Raspberry Pi for this to work? Or is it fine just being on my computer.
Many thanks in advance!
I would recommend you ask on the general NetBeans mailing list where you will find people with detailed Python knowledge.
almost all steps works well.
Eventhough, the remote platform does not appeared in my project properties>lib>java platform
I am using the netbeans 8.2
note that the connection to remote platform is successful in java platforms section.
but, the dropdown list of platforms (in project properties>lib>java platform) shows only the default platform.
could you assist me to resolve this problem?
Same here, Mohamed. Have you solved it?
.klaus
I realize this question is somewhat off topic, but I’ll ask anyway.
I have successfully used NetBeans running on a Mac to create, and then remotely deploy, run and debug Java programs on a Raspberry Pi 3. Well, at least programs that don’t use keyboard input. I tried that today, and when the program runs (on the Pi) and asks for keyboard input, and I type on the Mac, nothing happens. I am not exactly surprised by this, but I wonder if (a) this is truly expected, and if not how to fix it; and (b) if it is expected, is there a way to make NetBeans simply remotely deploy without trying to execute. I should perhaps add that I run my Pi headless, in that I use VNC server on the Pi and VNC viewer on the Mac. I suppose this could matter.
A different topic, I see mention of running NetBeans on a Pi 2. If that works well, I wonder if I might be better off altogether running NetBeans directly on the Pi since the Pi 3 is quite a bit faster.
Thanks.
Probably worth testing if it runs with a monitor attached (we did not test it headless). The VNC generally works very well on Pi (we find it fast and stable). The Pi3 is faster on Raspbian – we especially notice the difference on Chrome.
finally i found what i need. but it helps me at 80% unfortunately.
can i do this with my ipad pro? can i write code in different languages and send them to my pi3 for executing them and taking back results?
I do not believe that you can run Java or NetBeans on the iPad Pro.
The best place to ask about NetBeans now is on the Apache mailing lists.
https://cwiki.apache.org/confluence/display/NETBEANS/Mailing+lists